Expanding FreeBSD root filesystem (UFS)
Written by BiRU Wednesday, 28 February 2024 17:04
I use FreeBSD whenever I can as a server machine because I find it very reliable, with a very good amount of non invasive features and whit a very extensive documentation and toll chain.
It happens that sometime you end up your disk space, and usually you have two choices:
- add another disk and mount and link it somewhere within the root filesystem;
- expand the disk size directly, of course only if you are running on a virtual machine environment.
This is a rewriting of my previous post about partitioning resizing, with images and more detailed steps.
This post is focused on the second environment: adding space to a virtual machine root disk.
But before I continue with this post, allow me to make it clear the environment: - I use UFS as root filesystem, and even if this approach works for ZFS too, I haven’t tried it on such a filesystem;
- I recommend you to make a backup of the filesystem before proceed. In my case, since I’m running a virutal machine configured thru ansible I’m not scared of loosing data, but I recommend you to evaluate and do a backup before proceeding;
- I use GPT partitions;
- my root filesystem is mounted over
ada0, second partition thereforeada0p2.
You can always follow carefully the excellent FreeBSD documentation on resizing disks.
Doing the Disk Resize
The first step is to provide more space on the root disk, and I will not discuss here how I did because it depends on the actual virtual machine manager you are using.
Therefore, do stop the machine (you are not expecting to apply this on a live system, do you?) and enlarge the filesystem thru your virtual media manager.
Steps to make FreeBSD aware of the new space
Step 1: boot in single user mode
First of all, boot the machine in single user mode and get to a shell.
Step 2: print the list of partitions
Use gpart show with the disk name to get the list of partitions and find out the one you need to resize:

In the above example we need to resize ada0p2.
Please note that between the free space and the ada0p2 there is the swap partition, so we need to erase that first.
Step 3: delete partitions between the free space and your resizing partition
As already stated, between the free space available on disk and the partition I need to resize there is the swap partition ada0p3, so I need to erase that first.
In my case don’t need to swapoff the swap space, so I can go for the partition destruction.
However, before I’m able to act on the partition table there is the need to recover it. In fact, GPT scheme stores the partition data (backup) to the end of the disk, and since the end has grown, gpart is not able to find such copy of the data and assumes the partition is corrupted. It does suffice to issue a gpart recover ada0 to make gpart happy again. After that, it is possible to gpart delete -i 3 ada0 to erase the partition.

Step 4: resize the partition and resume swap
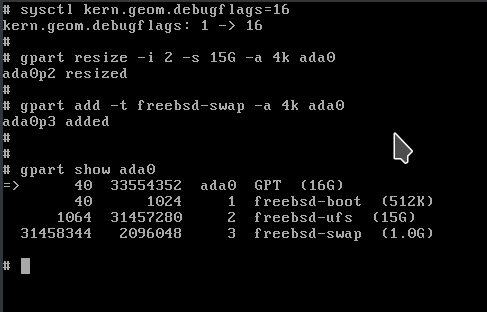
Now it is possible to resize the partition and add again a swap partition. The first step is to instrument the kernel to do so, and this requires to shut down extra dangerous partition protection by setting a kernel flag value.
Then you can resize the partition to less than the overall space, in order to let room for the swap partition, and then add the latter to the disk.
Therefore:
# sysctl kern.geom.debugflags=16
# gpart resize -i 2 -s 15G -a 4k ada0
# gpart add -t freebsd-swap -a 4k ada0
The resize command is the crucial part, and expands the partition up to 15 GB (change with your value) with a data alignment to 4kB.

Step 4: grow the root filesystem
It is amost done, but there is the need to grow the root filesystem. This can be easily done, on UFS, by means of growfs(1):

Note how growfs(1) displays the resizing from aorund seven gigabytes to fifteen, giving me a chance to check I’m doing the correct resizing.
Step 5: reboot
The easiest part (if your machine starts over again!**.
Just issue a reboot and check the new filesystem once you can login again.
Conclusions
GEOM is too much superior of any other filesystem I’ve ever used, and the above steps emphasize how simple it can be to resize even the root partition!
I remember doing the same resizing on a Linux machine with a volume manager, and it was a lot much more complicated and obscure, at least to me.


