
Master/Slave Concept:
While hosting a website, the database is of utmost importance as a small glitch in the database can make or break the whole website. Hence, we look for different ways to keep the database secured. One of the common methods used is the MySQL master-slave replication.
The Master-slave data replication allows data to be replicated over multiple backups in-order to keep the data secured in case of any mishaps. Here, the master database is treated as an authoritative source and the slave databases are synchronized to it. The master logs the updates, which then ripple through to the slaves. A database is “slaved” to a “master” when it receives a stream of updates from the master and database that receives functions as a copy.
Here, I’m going to mention a fairly unique issue where, a manual updation causes the replication to break and how this can be fixed.
Case history : In this case, there are two Database servers which works on the Master-Slave concept, which means one DB server is working as Master server and other as Slave server. Database syncing from Master to Slave is in such a way that the changes made in the Master server database ( Update, Delete or Insert etc), would get reflected in the Slave server database.
Unfortunately, a manual updation was done in the databases of the Slave server and that lead to chaos. It was found that updates made in the Master was not getting reflected in the Slave. So, there lies a probability that the manual sync on the slave server had put the replication down or Slave goes out of sync with master. Hence, manual updation of the database breaks the replication of database as the binary log file gets corrupted by the act. How to resolve this? Here is the solution!
This solution is based on some online research and this article will be a guide to reset MySQL replication.
Warning Message: All the Binlog files will get deleted so necessary backup of the binlog files should be taken for future reference.
In this case, ‘test_replication‘ database is used in both the Master and the Slave server.
Before proceeding further, make sure to purge all the databases from the slave server and create the same in the slave server.
PHASE I : On Slave server
After login to the MySQL, perform below steps .
MariaDB [(none)]> DROP DATABASE test_replication;
MariaDB [(none)]> CREATE DATABASE test_replication;
First step is to stop slave on slave server and this can be achieved by executing the following command after logging in to MySQL
MariaDB [(none)]>> STOP SLAVE;
PHASE II :On Master Server
In this section, reset the Master state by executing the below given command after login into the MySQL.
MariaDB [(none)]>RESET MASTER;
MariaDB [(none)]>FLUSH TABLES WITH READ LOCK;
Lock Tables: MySQL enables client sessions to acquire table locks explicitly for the purpose of cooperating with other sessions to have access to the tables, or to prevent other sessions from modifying tables during periods, when a session requires exclusive access to them. A session can acquire or release locks only for itself. One session cannot acquire locks for another session or release locks held by another session. Locks may be used to emulate transactions or to get more speed when updating tables.
Now verify the status of the Master using the below command.The result of this command is as follows.
MariaDB [(none)]>SHOW MASTER STATUS;

Note : Please write down the File (mysql-bin.000001) and Position (312) numbers, these numbers are required at a later stage for the reset.
Now we have to take a dump of the database that is being replicated using following command.
#mysqldump test_replication > test_replication.sql
Copy the dump file to the Slave server via SCP/rsync or by any other method.
#scp /root/test_replication.sql root@Slave_Server_IP:/root/
Once we have dump all the databases, again connect to mysql as root user and unlock tables.
MariaDB [(none)]> UNLOCK TABLES;
PHASE III : On Slave server
Import the dump file that was exported earlier and then restart the MySQL service.
#mysql -u root test_replication < test_replication.sql
#service mysqld restart
Now login into the MySQL as root user and then tell the slave to look for Master log file, that we have to write down the master with SHOW MASTER STATUS; command as File (mysql-bin.000324) and Position (11128445) numbers. You need to execute the below given command to reset the slave.
MariaDB [(none)]>RESET SLAVE;
MariaDB [(none)]>CHANGE MASTER TO MASTER_HOST=’Master_Server_IP‘, MASTER_USER=’slave_user‘, MASTER_PASSWORD=’password‘, MASTER_LOG_FILE=’mysql-bin.000001‘, MASTER_LOG_POS=312;

Here ‘slave_user’ is the user that we have created in Master with the grant privileges for replication. And replace Master_Server_IP with the Master server IP.
Now we need to start slave replication
MariaDB [(none)]>START SLAVE;
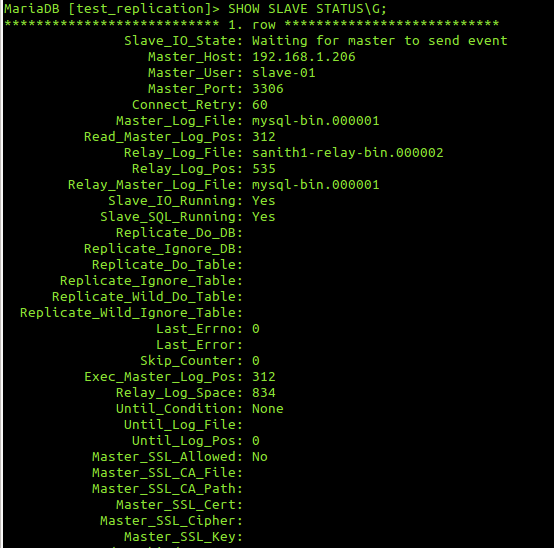
Now the replication has been re synced as the same as it was when newly configured.
This can be verified using the below given command:
MariaDB [(none)]> SHOW SLAVE STATUS\G;
Conclusion: So, we’ve seen how a simple thing as a manual updation can break the replication and we’ve also found out how we can fix this and re enable the replication as it was before.
A more reliable and advanced method to secure the database as well as to avoid issues like the one mentioned above, would be clustering. Unlike the Master-Slave setup which uses asynchronous replication, The MySQL Cluster uses synchronous replication and a failure is automatically detected as well as handled with the dead node being removed without affecting the application. Once the node is restarted, it will automatically be re-integrated into the cluster and will begin to handle requests straight away.