Setting up an IPv6 Tunnel
Written by BiRU Tuesday, 04 April 2017 18:43
So, you want to access IPv6 websites, but your ISP does not provide native IPv6 access? Well, here are some instructions for setting up a 6in4 IPv6 tunnel with Hurricane Electric!
Now, these instructions are for RedHat based distro’s, and were specifically written using CentOS 6. This type of ipv6 tunnel won’t work behind NAT, so your machine must be connected directly to the internet with a public IP address (UPDATE: Thanks to KingKurly for pointing out that you can forward Protocol 41 to enable a tunnel through NAT, if your device supports it). If you are looking for something that will work behind NAT, an AYIYA tunnel from SixXS.net should work over NAT for you, and we’ll cover how to do this in a future article. But, for now, let us continue with our 6in4 ipv6 tunnel from Hurricane Electric.
First, go to Hurricane Electric and get your free tunnel.
Next, open up ping requests from Hurricane Electric. This step is important, as they won’t allocate a tunnel if they can’t ping your machine. I normally don’t respond to ping requests, so I had to use a firewall rule like the one below to allow their pings through.
-A INPUT -p icmp -m icmp -m limit -s 66.220.2.74/32 -i eth0 --icmp-type 8 --limit 1/sec -j ACCEPT
Don’t forget to restart your firewall after making changes, to make sure your changes are active! service iptables restart
Once you have an account you will want to create a regular tunnel. This is basically an IPv4 tunnel between your computer and Hurricane Electric which carries your IPv6 traffic. Enter your IPv4 address as the tunnel’s endpoint address. After entering your IPv4 address, the website will check to make sure that it can ping your machine. If it cannot ping your machine, you will get an error like the one below:![]()
If this happens, go back and check your firewall rules, and make sure that you can ping your machine from the outside. If all else fails, try a more relaxed firewall rule, like this:
-A INPUT -p icmp -m icmp -s 66.220.2.74/32 -j ACCEPT
Or, even more relaxed:
-A INPUT -p icmp -m icmp -j ACCEPT
The first rule accepts all ICMP traffic from 66.220.2.74, while the second accepts all ICMP traffic from everyone.
Once everything is ready, you should see a message like this:![]()
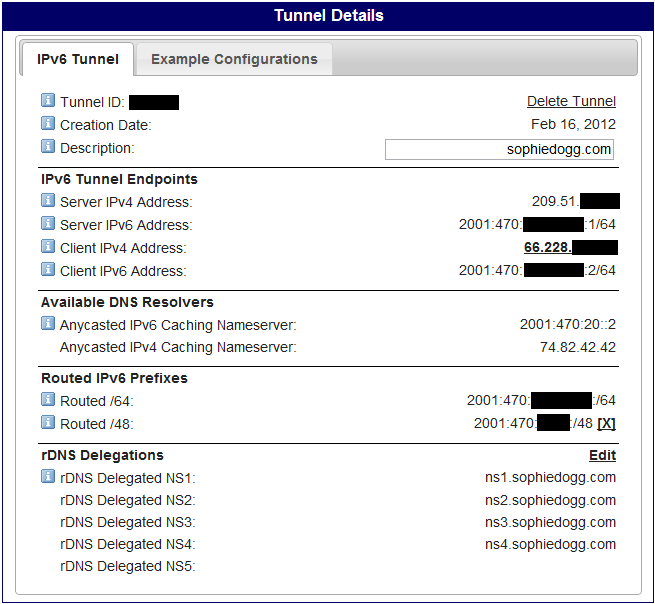
Now, it is time to configure our tunnel! Go to the Tunnel Details page of your tunnel, and start entering information. Give your tunnel a description, which can be anything you want. Then, assign a Routed /48, so we can have a larger block of addresses to play with. Finally, set up your rDNS delegations, by entering your DNS servers in the provided spaces. When you are all done, it should look something like this:
Next, it is time to configure the ipv6 tunnel on our server! We need to create an interface file for our IPv6 tunnel, so create the /etc/sysconfig/network-scripts/ifcfg-sit1 file and put the following in it:
# Hurricane Electric V6V4 ipv6 tunnel
ipv4a=209.51.xxx.xxx          # Server IPv4 Address from configuration above
ipv4b=66.228.xxx.xxx          # Client IPv4 Address from configuration above
ipv6a=2001:db8:xxxx:xxxx::1   # Server IPv6 Address from configuration above
ipv6b=2001:db8:xxxx:xxxx::2   # Client IPv6 Address from configuration above

NAME="Hurricane Electric SIT"
DEVICE=sit1
ONBOOT=yes
USERCTL=yes
BOOTPROTO=none
PEERDNS=no

IPV6INIT=yes
IPV6_AUTOTUNNEL=yes
IPV6ADDR="$ipv6b/64"
IPV6_ROUTER=yes
IPV6_AUTOCONF=no

IPV6_CONTROL_RADVD=yes
IPV6TUNNELIPV4=$ipv4a
IPV6TUNNELIPV4LOCAL=$ipv4b

PHYSDEV=eth0
TYPE=sit
DEVICETYPE=sit
NM_CONTROLLED=no

NETWORKING_IPV6
IPV6_DEFAULTGW=$ipv6a
IPV6_DEFAUTLDEV=sit1
Don’t forget to change the IP addresses at the top of the file to match yours!
Now, all that is left is to assign some IPv6 addresses to our interfaces! In your /etc/sysconfig/network-scripts/ifcfg-eth0 file, you can add a few lines like the following:
#HE.net ipv6 tunnel config
IPV6INIT=yes
IPV6ADDR=2001:db8:xxxx:xxxx::1/64
IPV6ADDR_SECONDARIES="2001:db8:xxxx:xxxx::1/64 2001:db8:xxxx:xxxx::1/64"
Make sure you change the IPv6 addresses to match what you have been given by Hurricane Electric!
After restarting your network (with service network restart), you should be up and running! You can browse to an IPv6 website or try to ping an IPv6 address, to see if your IPv6 setup is working.
Next, you can configure your forward and reverse DNS zones with the necessary records to show off your shiny new IPv6 addresses!


